Culinary
Alumni
Culinary
JWU Recipes: Snowflake Cookies
We tend to seek special treats around the holidays, and snowflake cookies make a perfect seasonal snack. Javier Diaz Rodriguez '23, a junior in the Baking & Pastry Arts B.S. program, and Lissa Herrera '22, a senior studying Baking & Pastry Arts and Food & Beverage Industry Management, met up at JWU’s Harborside Campus to share an iced cookie recipe that’s great for wintertime, yet versatile enough to shape and decorate for any season or occasion. The cookies themselves are not very sweet, which balances well with the sweet royal icing.
Javier, who is from Puerto Rico, originally attended JWU’s Miami Campus and developed the recipe there with a culinary co-worker, continuing to tweak it today and adding different flairs such as stamping the cookies and tracing the stamped shape in colors such as gold, as he did to create edible favors for a recent shower event. This Sugar Cookies with Royal Icing recipe is still his favorite to make, and Lissa joined him in walking us through the steps so we could all try the cookies at home. They both appreciate that this recipe doesn’t expand much in the oven, retaining the intended shape well.
Watch the duo make the complete recipe below, then follow the directions to make them at home!
@johnsonandwales Are you looking to get into the holiday spirit? Look no further- Learn how to make snowflake sugar cookies with JWU students! ❄️ #fyp #IAmJWU
♬ SUGAR, SUGAR - The Archies
Food for Thought: Talking Baked Goods
It's difficult not to be in a JWU kitchen with passionate culinary Teaching Assistants and not discuss food. We ask both Javier and Lissa, as well as Culinary Arts major Esmeralda Bencosme '22, a few questions as preparations are underway for making Javier's sugar cookies with royal icing.
Right now, JWU is preparing for a winter break (hence the snowflake theme to these cookies!), so we wondered if there were any recipes the students planned to make while away from campus. Lissa is hoping to make beignets, a type of croissant-like puffed pastry. Normally, she is sought out by family and friends to bake cakes, so this would be a new avenue for her.
Javier shares that he enjoys making and decorating cakes more than any other pastry or bread, as they give him a chance to express his creativity. And Esmerelda is hoping to make fresh bread for her family, noting she usually makes lasagna or garlic bread but has been looking foward to baking her relatives either sourdough bread or homemade dinner rolls.
As for holiday traditions, Lissa’s family is from El Salvidor, so she makes an annual Pan De Torta Salvadoreño that’s a cake bread with a sugary top that's eaten along with coffee. She learned the family recipe from her uncle but has improved it over the years. The bread is normally denser, but prefers to bake an airy version where she separates the egg whites and yolks, creating and folding in a merengue. Javier, on the other hand, is already being chased with orders for his version of his home island’s traditional holiday Tembleque, which he describes as a coconut pudding typically served with cinnamon on top.
All this talk of food is making us hungry. Let’s get baking so we can taste some cookies!
Sugar Cookies with Icing
Makes several dozen (the total depends on the size of the cookie cutter or of the dough shapes)
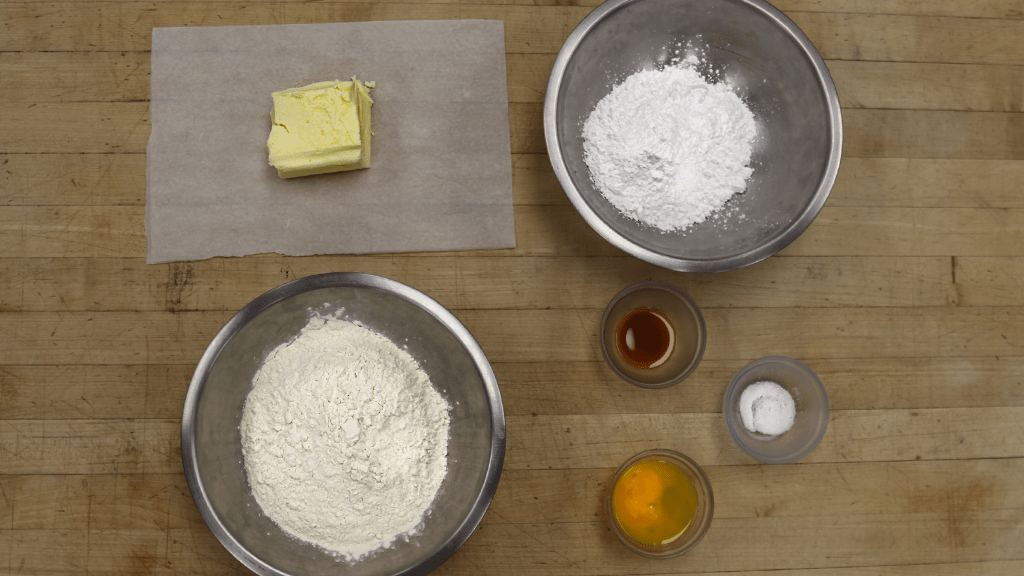
For the cookie dough:
- 1 pound (4 sticks) of unsalted butter, refrigerated
- 2 eggs
- 1 gram (about ¼ teaspoon) of vanilla extract
- 10 grams (about 2-1/4 teaspoon) of salt
- 855 grams (about 3-3/4 cups) of all-purpose flour
- 335 grams (about 2-2/3 cups) of 10X confectioners sugar (this means that the sugar has been processed ten times, making it very fine with a smooth texture)
For the royal icing:
- 1 pound (2 cups) of confectioners sugar
- A pinch (about 1/8 teaspoon) of cream of tartar
- 3 ounces of egg whites (two eggs would provide approximately this amount of egg white, but it’s safer to purchase pasteurized egg whites from a grocery store)
Before beginning these steps, heat your oven to 325 degrees.
Preparing the Dough
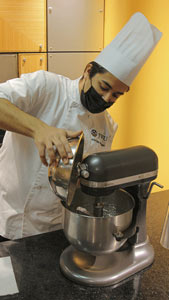
In an electric mixer, start creaming the butter by itself. Because it’s cold, it will need 1-2 minutes of mixing to soften it.
Next, add in your sugar (being careful to do it slowly so as not to make a mess!) and cream the butter and sugar together for 3-5 minutes, until you see the color become pale and uniform. Use a spatula to scrape down the sides of the bowl periodically so that everything gets thoroughly mixed.
Then, add the eggs, vanilla, and salt. Cream the ingredients one more time, mixing it all together.
Finally, add in the flour. Be sure to do it slowly so it doesn’t make a mess! As soon as you see that the ingredients are all combined and uniform, stop mixing.
Smoosh your mixed dough into a ball and then spread it between two folded sheets of parchment paper, rolling it flat with a rolling pin and eyeballing its thickness to around 1/4." Rolling it much thinner or thicker would create an imbalance with the amount of royal icing that can be added later.
Javier suggests placing the flattened dough in the freezer for 10 minutes to firm it a bit, which creates a sharper cut when using your cookie cutter in the next step.
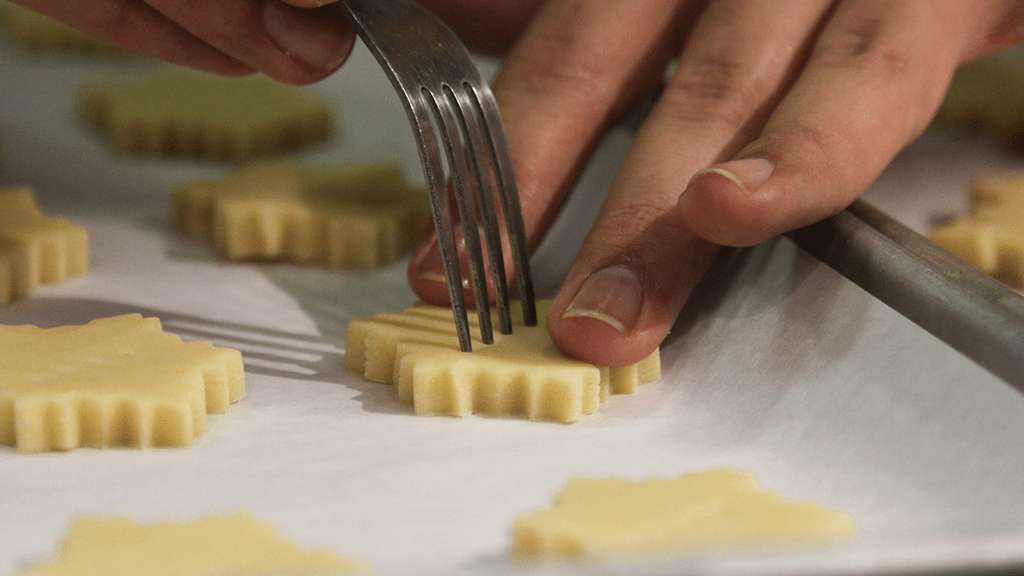
Press a cookie cutter into your dough and place the cutout shapes on your baking sheet around an inch apart. You can also skip a cookie cutter and just roll the dough into balls, pressing them down by hand.
Finally, Javier suggests poking a fork into the top of your cookies to help with air flow, which will avoid creating any “mountains” of air bubbles. Don't worry about the dots this leaves, as the icing will cover them!
Bake your cookies for approximately 10 minutes for smaller cutouts and 15 minutes for larger cutouts or thicker dough. When the edges start to brown, they are done.
Tips and Tricks for Cookie Dough Success
- Use refrigerated butter, which better holds cell structure and ensures crisp baked goods. If your butter is room temperature, that’s OK, but you won't need to cream it on its own and can jump right into creaming it with the suger.
- If substituting granulated sugar for the confectioners sugar, you must refrigerate the dough for at least two hours before rolling it out and pressing into shapes. Otherwise, the texture would be too grainy.
- Overmixing the dough once you add the flour is an easy mistake to make, so stop as soon as everything appears to be combined. Otherwise you will overwork the gluten, which makes the dough tougher than it needs to be.
- Roll your dough between sheets of parchment to avoid having to flour a smooth surface. Flour changes the chemical makeup of your recipe, drying out your dough and making the cookie crumble when bitten.
- When you remove the cookies from the oven, let them cool directly on the cookie tray. Moving them to a cooling rack while they're soft could break them.
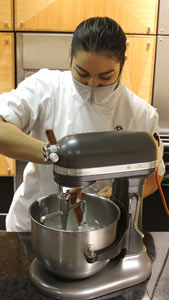
Preparing the Royal Icing
With just three ingredients, the royal icing is quick and easy to make!
First, mix the powdered sugar and cream of tarter in an electric mixer.
Add the egg whites, starting off mixing slowly and scraping the sides well to make sure everything combines. Your cream of tarter will add a shiny effect to the royal icing.
Stop when the ingredients are completely combined and when the mix drips slowly as a thick fluid. If it appears runny you can add more confectioners sugar to thicken it.
Add your desired food color and continue mixing. (Or if you want to use both white and colored frosting, pour half of the icing into a separate bowl to remain white, while adding food coloring to the half left in the mixer.) Add just one drop of gel coloring, or a few drops of liquid coloring, to start and then add more if more color is needed.
Tips and Tricks for Royal Icing Success
- Do use pasteurized egg whites from a grocery store rather than separating raw eggs yourself. Unlike the eggs in the cookie dough, the icing will not be baked and therefore could include a risk of salmonella from unpasteurized eggs.
- Gel food coloring works best, as it doesn't affect the liquid content. The liquid type of food coloring carried in grocery stores is fine, but as it has a high water content, you may need to add a bit more powdered sugar to balance it out.
Decorating Your Cookies with Royal Icing
Fill a piping bag (but don’t overfill!) with your icing. If you have divided into more than one color, this should be the main color of your cookie.
Draw the outside border first before filling in the middle. Then use a toothpick to help smooth and flatten your icing uniformly to the corners.

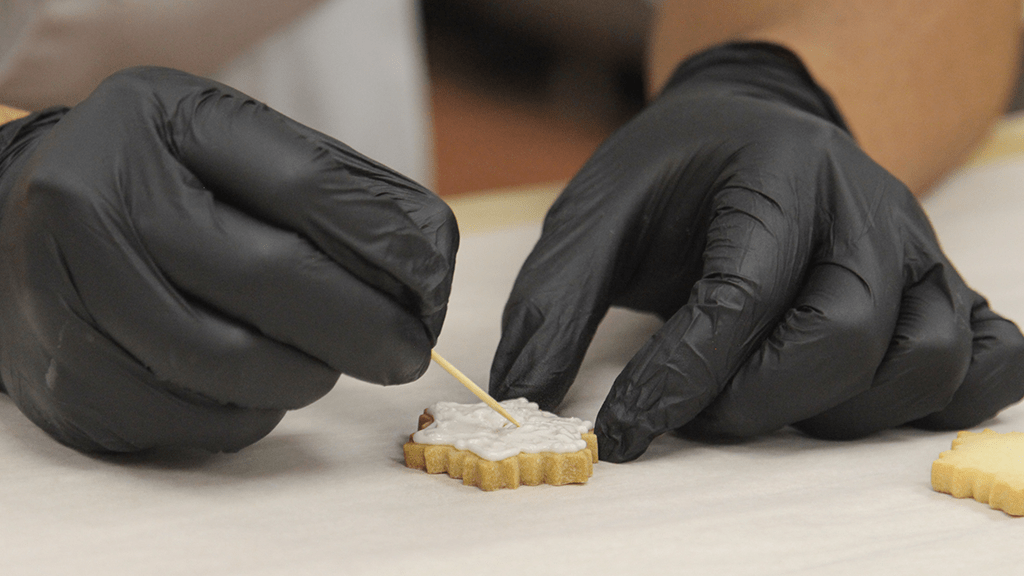
Let your icing set (it takes 5-10 minutes depending on how thickly you spread it) before attepting to move, touch or draw on the cookie.
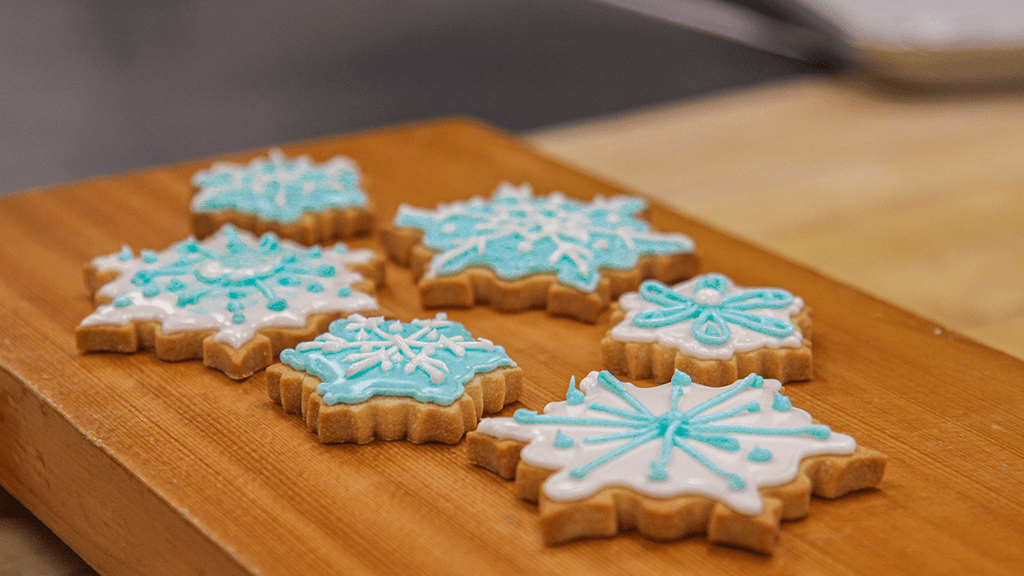
Draw on your second layer using another piping bag with your other color.
Tips and Tricks for Decorating Success
- Keep a damp paper towel over your bowl of royal icing to keep it from drying out.
- If you don’t own a piping bag, you can roll a sheet of waxed paper into a cone and gently snip off a very small tip.
- Do the first layer on all of your cookies at once, so that once you’re ready to go back and add a second layer, the first cookie should be ready.
- If you don’t want to use royal icing, you can cover your cookies with fondant. Fondant can be rolled out and stamped with the same cookie cutter as the cookies, making it an easy match, and you can use the royal icing to write or design on top of the fondant.
Once you have decorated all of the cookies to your liking, you can store them in a container for up to a week or freeze them if they won’t be eaten right away.
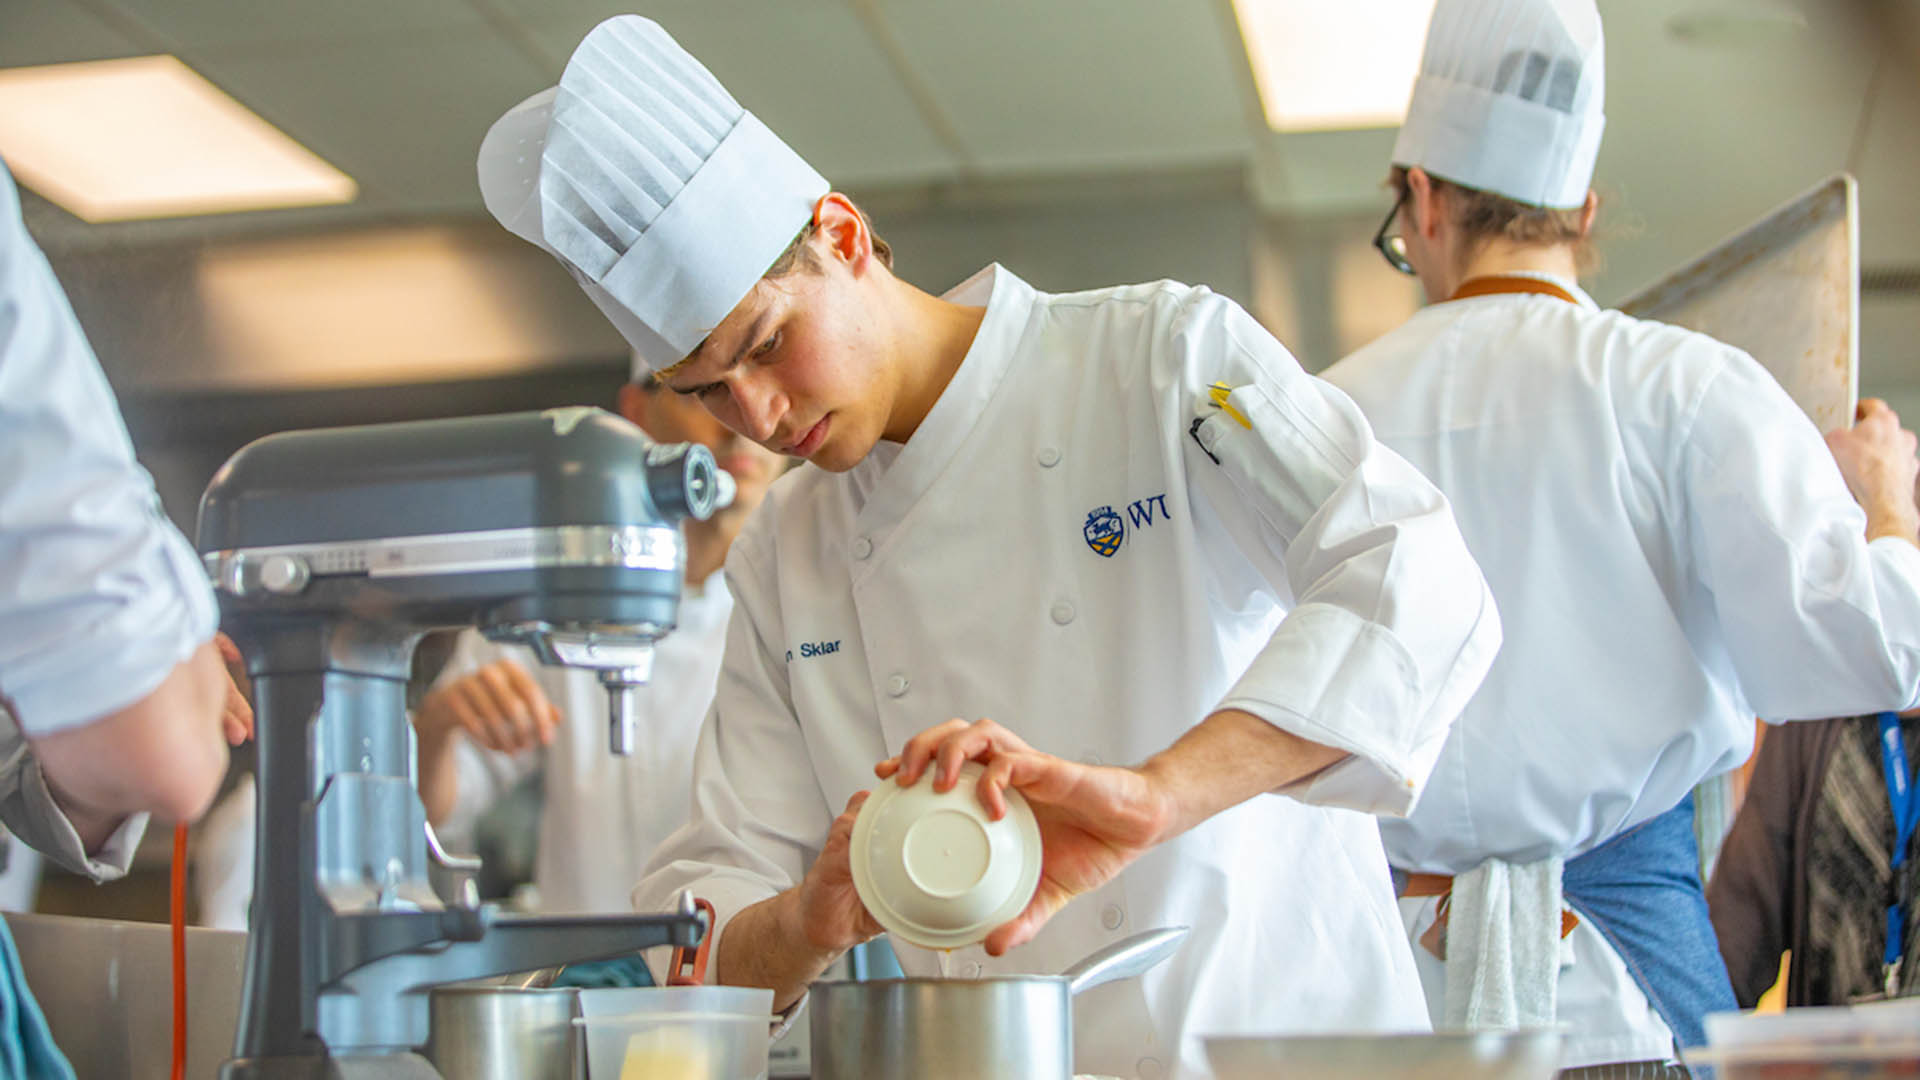
What's Next for Three of Our JWU Culinary TAs?
We always love hearing about what's next for JWU students, and our helpful TAs were happy to indulge us as we indulged in sampling cookies.
Javier shared that he would like to return to Puerto Rico when he graduates next spring. However, he's open to possibilities; if he finds a great baking or pastry job around here, he will stay in the area. Lissa, meanwhile, has a job with Compass Group, and her plan is to remain with the company for now and see where her culinary career takes her.
Esmerelda hopes to have her own private catering company after she graduates JWU, and her goal is to eventually open her own restaurant. JWU’s culinary program attracted her because of the different options it offered.
"I loved that I could work with food in ways that I did not imagine," she says. "My favorite thing at JWU was learning how to start a restaurant and create a business plan. I enjoy working with Culinary Operations because of the opportunities that the job provides and all the things I’ve learned that I wouldn’t be able to learn in class. I have learned a lot about leadership, equipment, and how to handle difficult situations. This summer I had the privilege of catering for Obama’s 60th birthday party at Martha’s vineyard. It was an experience I will never forget thanks to my job!"
PHOTOS FROM TOP: ALL THE INGREDIENTS FOR THE SUGAR COOKIE DOUGH; JAVIER DIAZ RODRIGUEZ '23 ADDS THE CONFECTIONERS SUGAR TO THE CREAMED BUTTER; POKING A FORK INTO THE COOKIES WILL CREATE AIR FLOW AND AVOID BUBBLES; LISSA HERRERA '22 MIXES THE ROYAL ICING; PIPING THE OUTLINE OF THE ICING FIRST; SPREAD AND SMOOTH ICING WITH A TOOTHPICK; THE FINAL DECORATED SNOWFLAKE COOKIES
Related Posts

Alumni
Culinary
Experiential Education
How a Summer Stint at the Modern Supercharged a Young Pastry Chef’s Skill Set
Culinary
News
2026 James Beard Awards Highlight JWU Alumni Excellence

Experiential Education
Culinary
Hospitality & Business